Digital Imaging States
In a nutshell: Scene-Referred imagery should capture a wide dynamic range and light sources should have realistic luminance values. We cannot directly display wide dynamic ranges onto regular output devices (TVs, monitors). Tone compression/mapping is required to capture the feeling of high dynamic range onto display-referred imagery, suitable for display devices such as sRGB monitors, Rec. 709 TVs and Rec. 2020 HDR displays.
Digital Imaging States - Display-Referred and Scene-Referred Imagery
This blog post will cover a small but in my opinion, immensely important topic in digital imagery. It is relevant for 3D artists involved in lighting and lookdev but also graphics engineers.
Digital images can have different “imaging states”. The key ones we are interested in are “display-referred” and “scene-referred”. Display-Referred means we are talking about images with respect to display devices. Scene referred is talking about images related to input devices or “scenes”.
Display-Referred
Key points:
- Used to represent output pixels on a screen. In range [0, 1]
- Limited dynamic range!
- Represented via 8-bit image formats such as .jpeg or .png
Display-referred imagery is what we are probably most familiar with. These are representing pixels coming out of the screen and are in the range of [0, 1]. 0 means that the particular pixel is turned off (to represent black) and 1 being a pixel fully lit up (representing “white”). These are usually low dynamic range images in 8-bit representation, usually seen in software as a 0-255 range. This is great and a familiar format but it has severe limitations when viewed in the context of an HDR, physically based rendering framework. Since display-referred images are limited to 8-bit representations, when we see these images on a 10-bit HDR device we will see visible banding artefacts.
The limited dynamic range becomes problematic too. Using 18% grey as our reference value, the 0-255 range of an 8-bit image only really allows for 2.5 stops of dynamic range. In real life, human vision is estimated to allow for about 20 stops of visible dynamic range. This means that clearly, display-referred imagery cannot represent the dynamic range of real life. For example, in an 8-bit image, perhaps the sun and a household bulb are both in the same image. Since both are very bright, both have a value of (1.0, 1.0, 1.0). This implies that perhaps the bulb and the sun are of the same brightness, but clearly this is not true! The sun is many magnitudes brighter than a household bulb. So unfortunately working in a low dynamic range, display-referred imaging context is not going to cut it, when we want to render images physically based and protect for HDR devices.
Scene-Referred
Key points:
- A “scene” can refer to real-life or a digitally renderered “environment”
- Usually images represented as 16-bit/32-bit floating point .exr or .hdr file formats
- Very large dynamic range that cannot directly be mapped 1-1 onto real-world display devices
- Linear light values (no gamma curves) where pixel luminance has a direct correlation to a real world scene in range [0, infinity]
So, clearly we have some limitations with only working with display-referred imagery. Notably its poor bit-depth and lack of dynamic range. Luckily, this is where scene-referred imagery becomes critical to our CG pipelines! In scene-referred context, a pixel value has a direct correlation to a real luminance value. Instead of having an sRGB gamma curve, scene-referred imagery expects us to be working in a linear light context. Additionally, we are not limiting the dynamic range like display-referred imagery which only has a dynamic range of around 2.5 stops.
This is a really important point about scene-referred imagery; the ability to represent real-world dynamic ranges. We can genuinely simulate the dynamic range of the real world (within reason) which is desirable in a CG physically based rendering framework. In the pursuit of photorealism, this is a desirable attribute. If we are looking to capture the qualities of cinema photograph, well then digital film cameras such as Arri Alexa’s or Red are capturing the real-world (with all its dynamic range), albeit with synthetic lights, diffusion, flags etc but it is a real scene with many stops of dynamic range. However, it is important to note that having an imaging state that captures the dynamic range of a “scene” isn’t a free ticket to photorealism. Remember that display devices such as sRGB monitors, Rec. 709 TVs and even Rec. 2020 HDR displays cannot directly display such a large dynamic range (and probably this isn’t desirable anyway, it can cause eye strain looking at very very bright displays!). To go from a scene-referred image state into something that we can display on an output device, we will require some sort of tone mapping or display transform to capture the creative and rendering intent onto a lower dynamic range display device.
Practical Examples
So that’s a high level overview of the difference between the two imaging states. Let’s take a look at some proper examples to illustrate the point more clearly.
Example 1 - Exposure

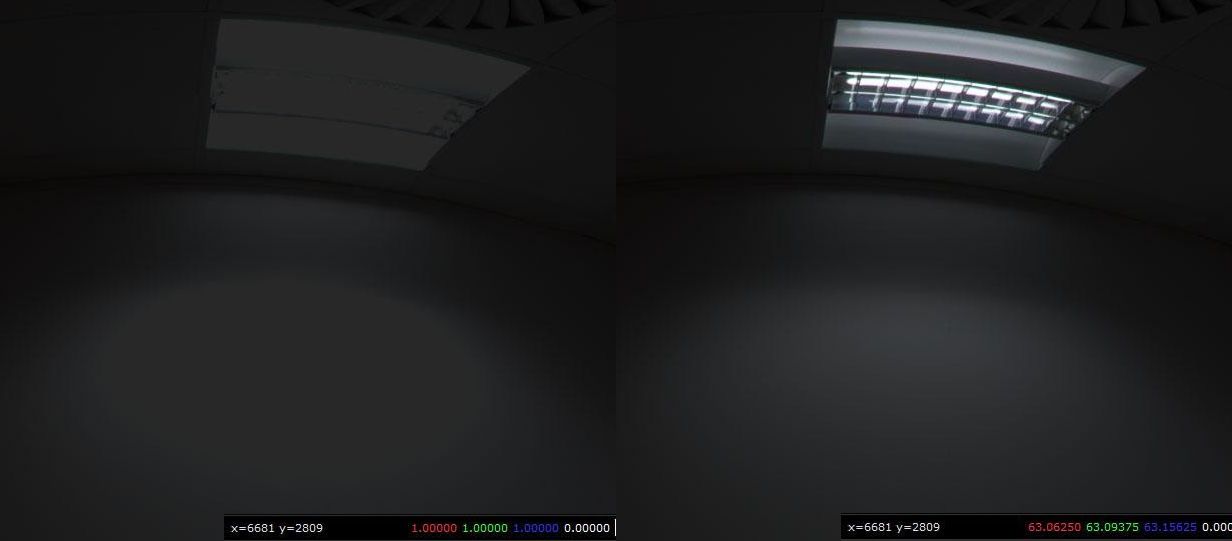
Here’s an image of a ceiling light. On the left, we have display-referred and on the right we have scene-referred. Both look the same, so what’s the point in putting all this effort into 16-bit .exr files, when 8-bit .png looks the same? Well, if we inspect the pixel value of the light, the display-referred image says the ceiling light value is (1.0, 1.0, 1.0). But on the scene-referred image, it has a value of (63.0, 63.0, 63.0). That’s a huge difference in brightness!
Here we have pulled the exposure down about 2.5 stops. We can see that the display-referred image has clear clipping issues. What was once bright looking, is now dull and lacks any information. However, on scene-referred side, we can still see the light fixture is still very bright, it looks like how we’d expect the light to see if it was on a dimmer. It is more realistic and capable of displaying the dynamic range of real world scenes. Display-referred clearly just doesn’t have the bit-depth or dynamic range for this!
Example 2 - Lighting
Lets take a look at how display-referred and scene-referred imagery has a huge impact on physically based lighting. In this example we have an unclamped HDRI (values in a large dynamic range), an HDRI clamped at 10.0 and an HDRI clamped at 1.0 (display-referred dynamic range).
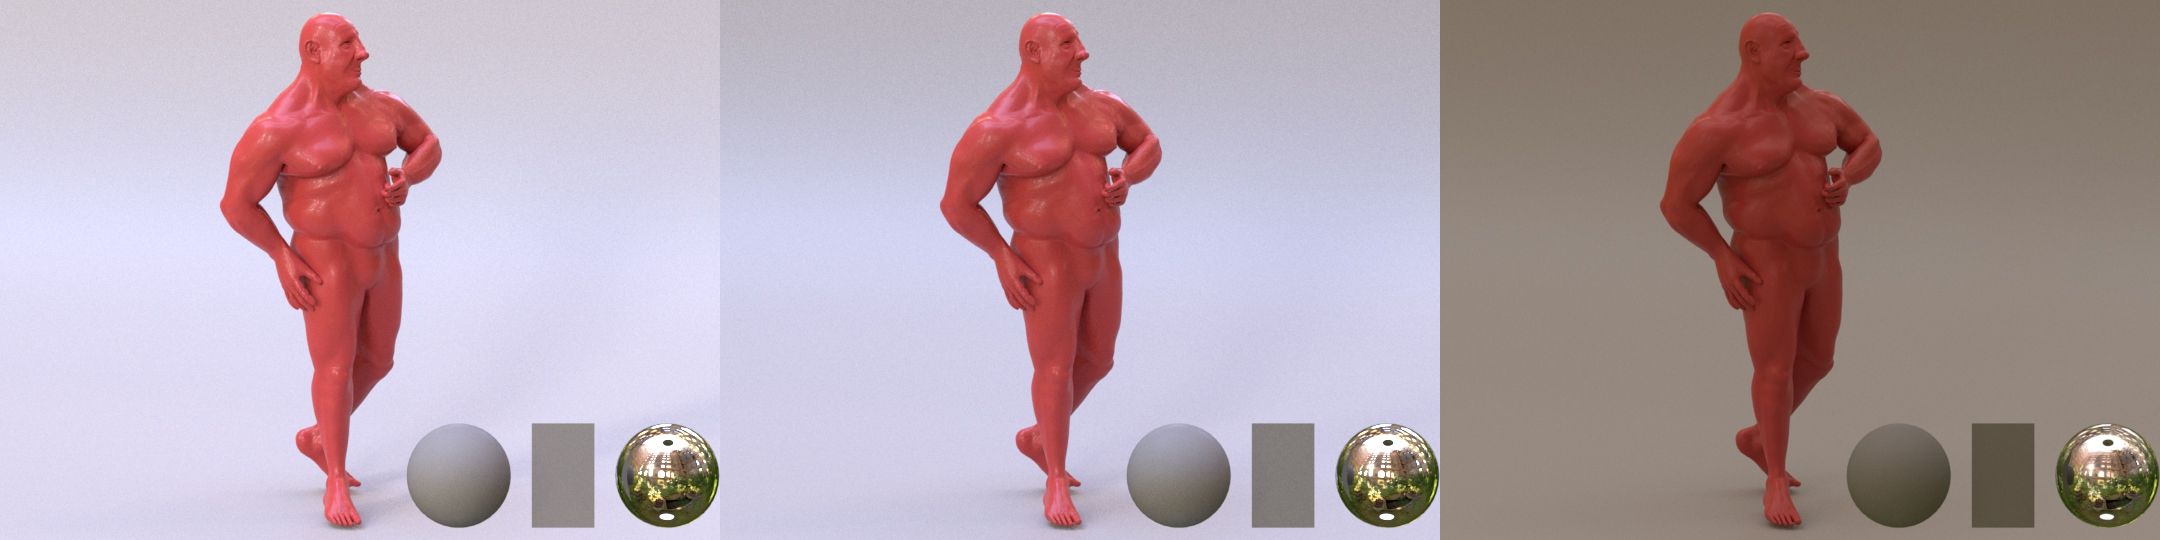
Even though in the chrome ball, it looks like the same image, there is clearly a huge difference in final lighting contribution, in both specular and diffuse components. This is really crucial to bear in mind- PBR shaders require accurate light values to work correctly! This means we cannot just set up a distant or area light and put in a value of (1.0, 1.0, 1.0) and call it done. Likewise we also shouldn’t be putting arbitrary intensity values in lights such as 24,000 and deciding whether or not it looks “bright enough” on our displays. It is super crucial to make sure our lights reflect some sort of physical value. We really shouldn’t be in a situation where indoor household bulbs are set to be brighter than big industrial fluorescent lights, or the sunlight is only a few stops brighter than a candle light. Physically plausible light values will make a world of difference. It leads to more predictable and believable light simulation (especially for indirect and specular contribution) and we are protected to HDR displays (since the dynamic range is already there in our “scenes”). Remember, a candle, spotlight and the sun are all “bright”, but they have very different luminance values.
Example 3 - Tone reproduction/mapping
So we know that if we want physically plausible images with accurate light simulation, we need to be working in a high dynamic range, scene-referred imaging state. That’s fine, but we still are left with an issue. How do we display a high dynamic range image onto these low dynamic range display devices? We surely don’t want to have a hard clamp/clip on the highlights, that wouldn’t look very appealing at all, and since 8-bit images clip after 2.5 stops of exposure, this would really limits us.
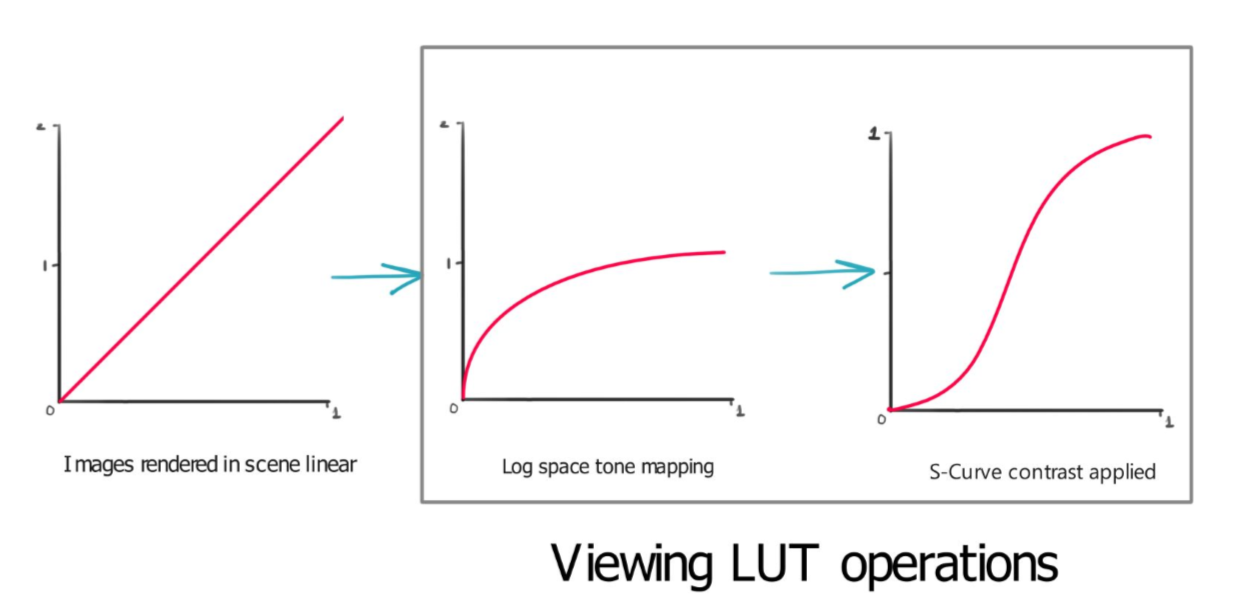
This is quite a large topic so for now, I’ll just give an overview of a large principal behind tone mapping. Remember that on SDR displays we are limited to their small dynamic range. So what we ideally want to do, is take our scene-referred, linear images and apply some sort of function that squeezes and compresses the dynamic range into something representative and visually appealing. So, we can take a linear image with a pixel value range of say 0.0 up to 100.0 and apply some sort of Log function to compress the dynamic range as much as possible into a 0.0 to 1.0 range. This results in a pretty washed-out, flat looking image but that’s okay because we now have compressed the dynamic range into something that works for a display-referred imagery context. To make the image now look more natural to our eyes, we can apply an s-curve.
Now, lets compare this to if we took our scene-referred linear image and did nothing to transfer it into display-referred apart from a gamma curve.
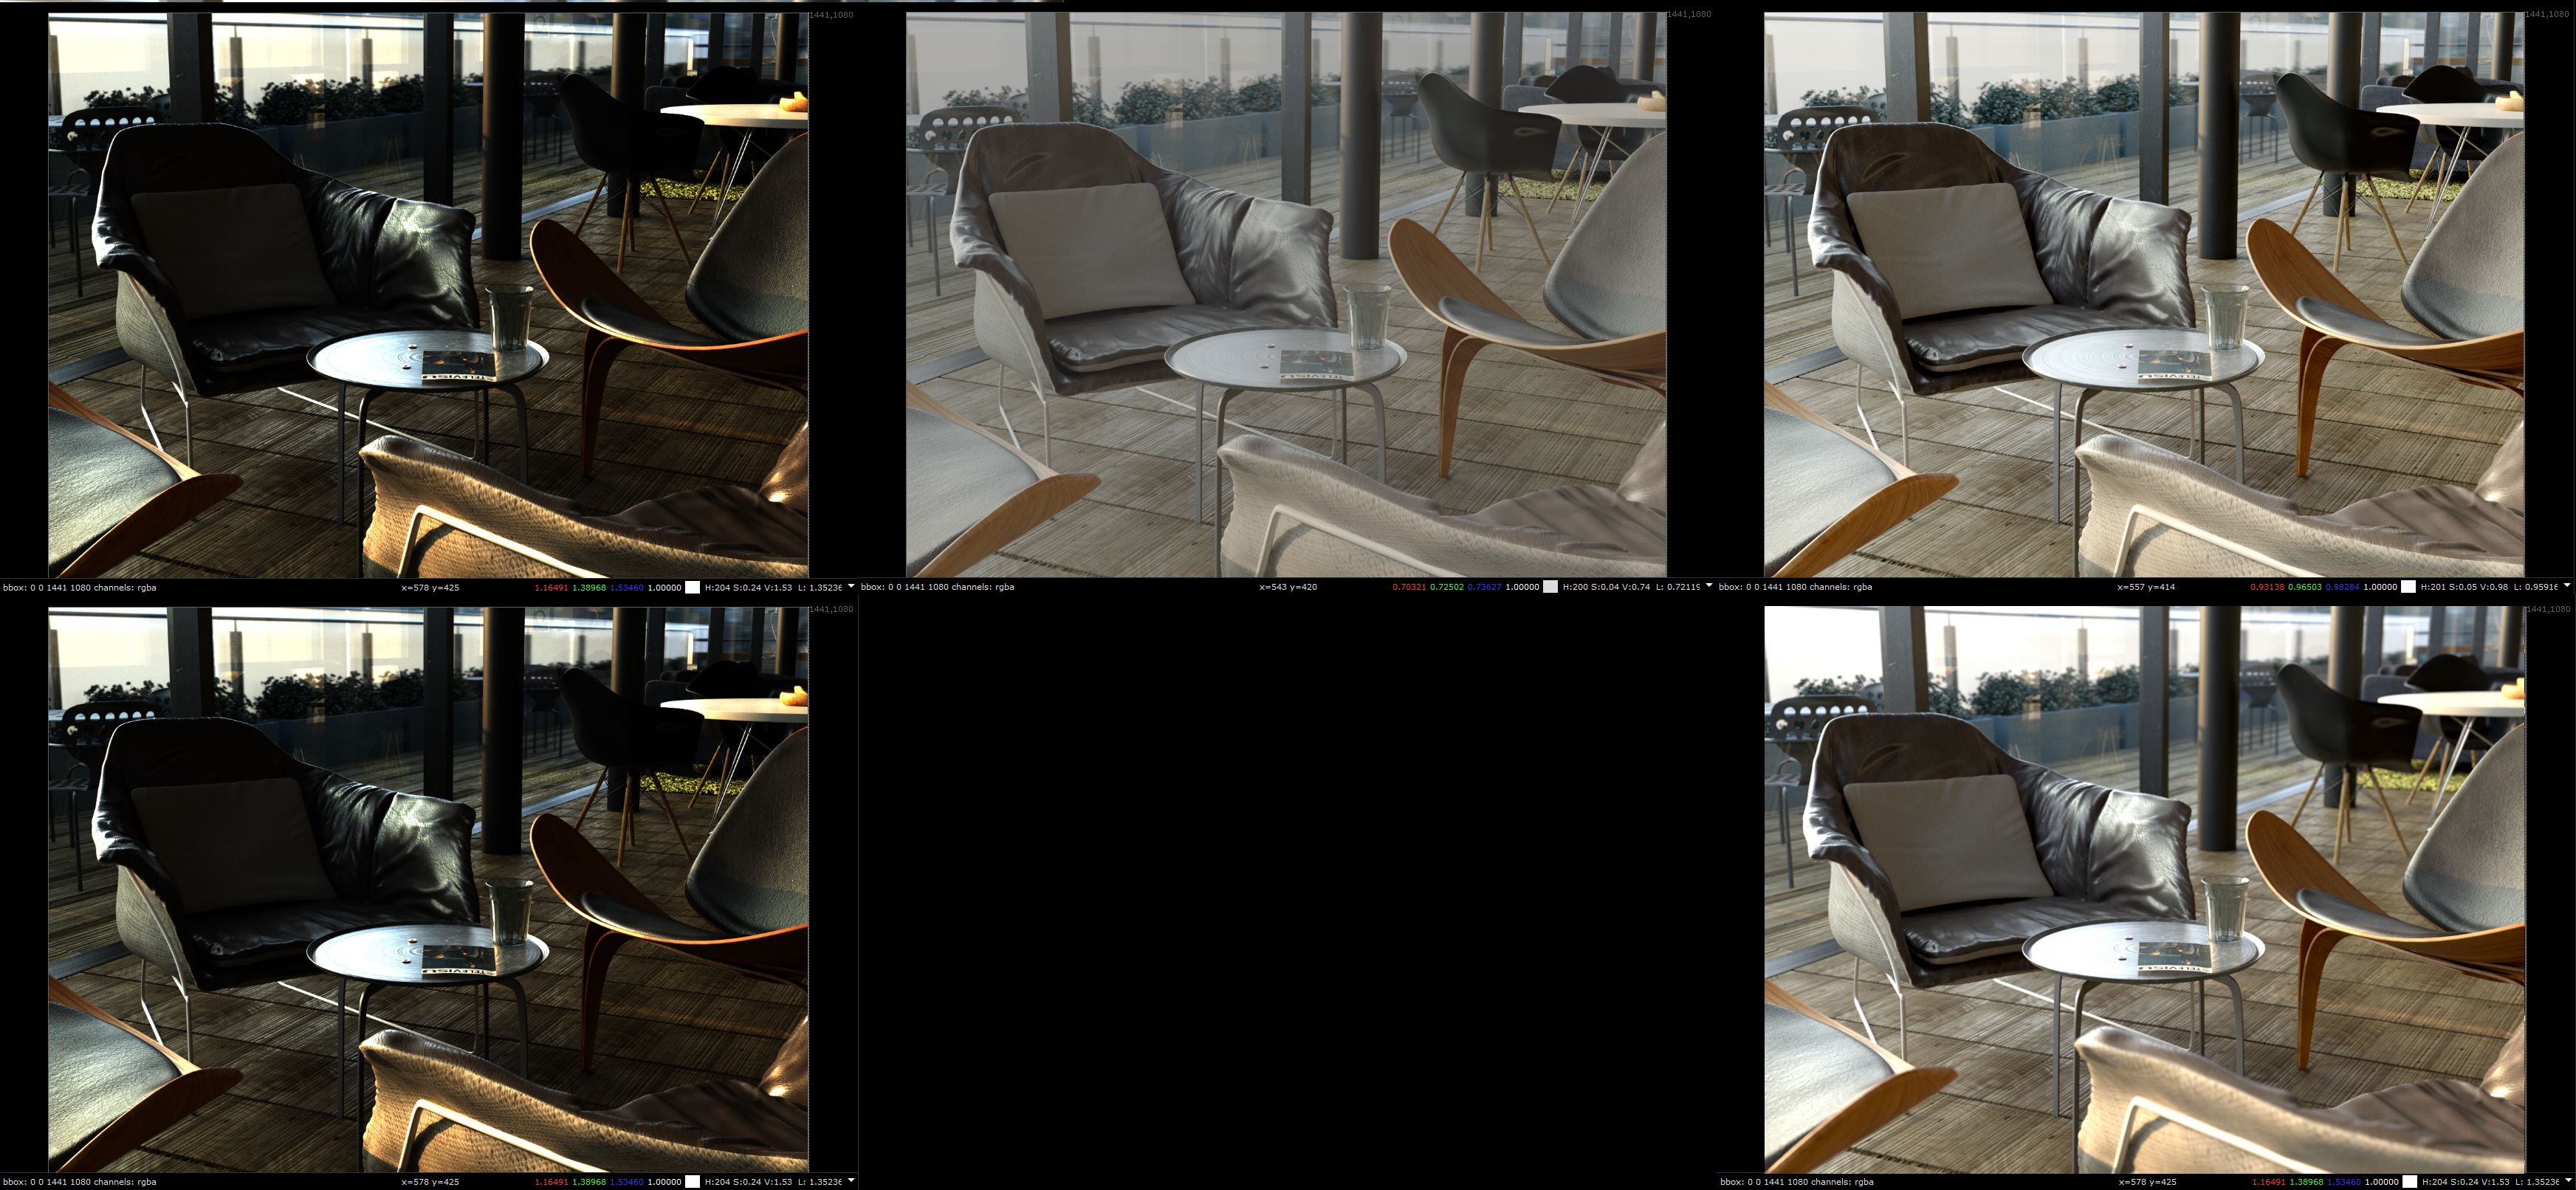
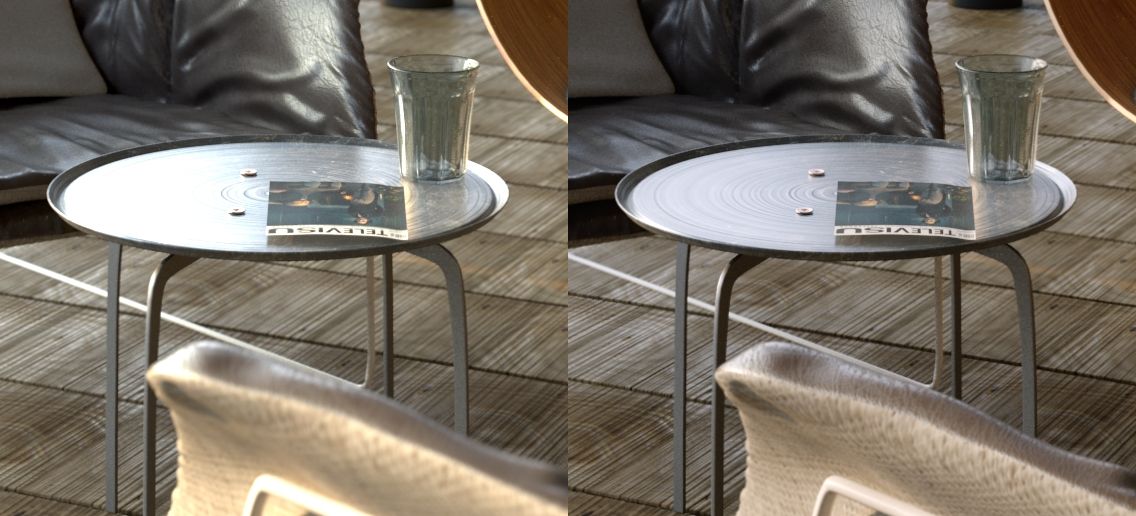
Can you see how the details in the highlights are totally lost? They are completely clipped and we lose a lot of detail. If we are working in a display-referred context, often the solution would be to reduce the light intensities. Yes, that would work but this means we lose out on realistic indirect/specular lighting and end up adding “cheat” ambient fill lights to compensate. This is not physically plausible and we are instead authoring content for the display and not the scene. Additionally, if we did work in this display-referred manner, it means when we try display our imagery on an HDR device, since it lacks realistic dynamic range, everything will look quite dull and unspectacular. So the display transform, and tone mapping is a really crucial part.
Summary - Why this is important
-
Physically based rendering frameworks expect scene-referred values (don’t be afraid of pixel values higher than 1.0 when working in scene-referred space!). This benefits light transport, shading and post-process effects such as defocus blur, bloom, lens flares.
-
It improves our existing imagery on sRGB/Rec. 709 displays, but means we protect for HDR devices too
-
Having images saved in 16/32-bit floating point images preserve creative and rendering intent for archiving/remaster purposes
Hopefully this helps illustrate why differentiating between display-referred and scene-referred imagery is important. Thanks for reading!